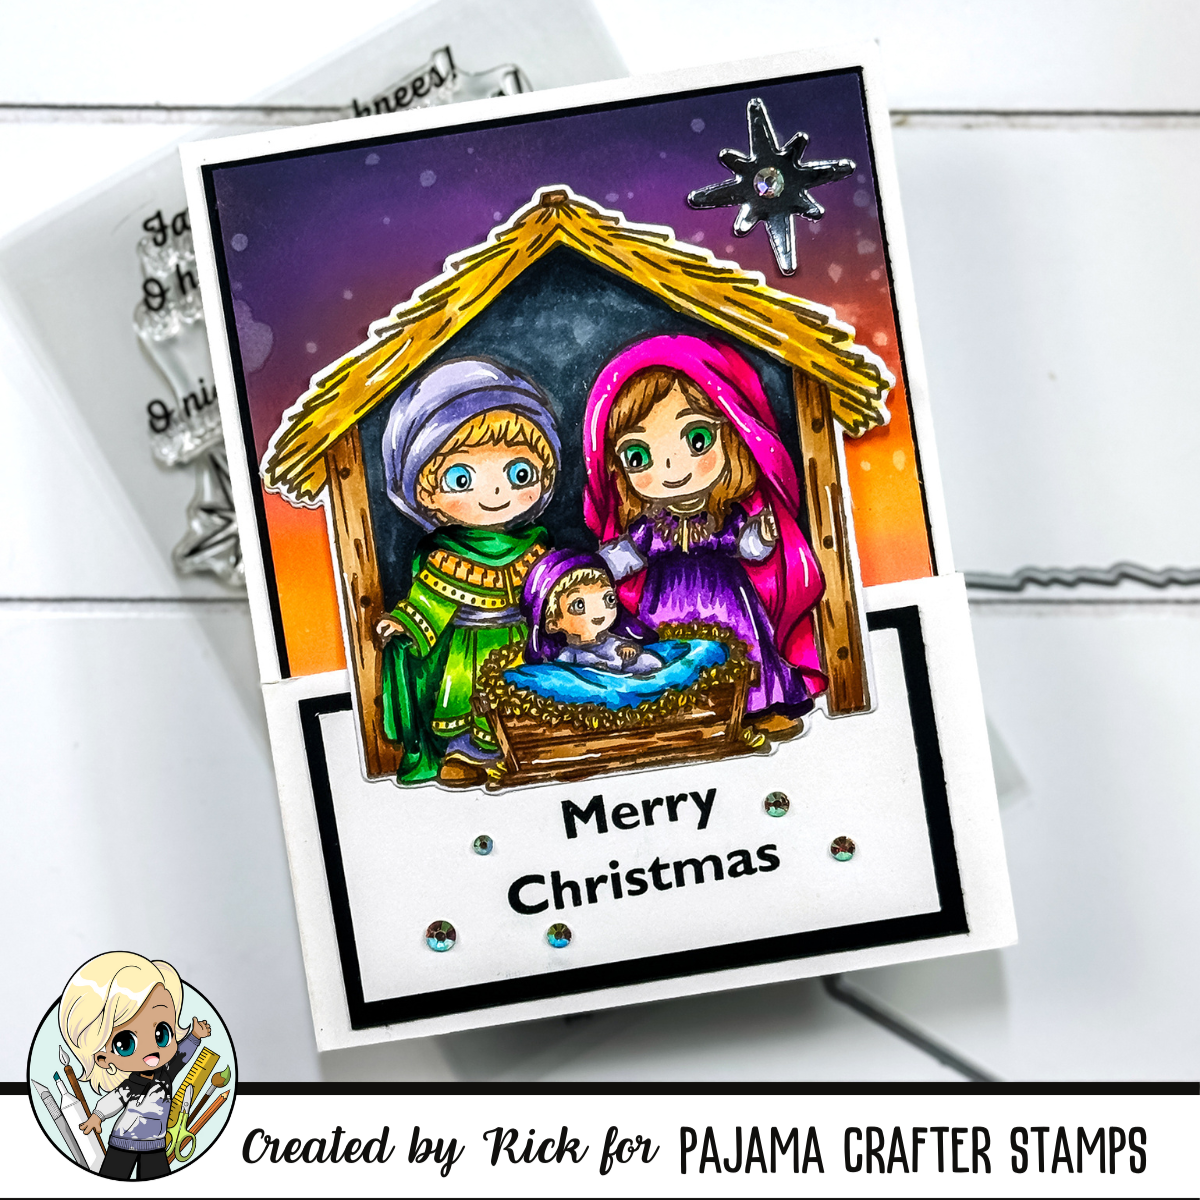
Hello, crafty friends! Rick here, writing for the Pajama Crafter Stamps Blog today, and I’m excited to share a heartfelt and unique Christmas project with you. We’ll be using the Night Divine Stamp Set and coordinating dies from Pajama Crafter Stamps to create a beautiful fun fold card that showcases the classic nativity scene. This project is perfect if you’re looking to add a special touch to your holiday card-making while keeping things simple yet meaningful.

I love incorporating interactive elements into my cards, and a fun fold design is a great way to surprise the recipient. It’s a fantastic technique to highlight the serene nativity scene in this set while adding a little extra “wow” factor. Let’s dive into the details of how I brought this design to life.
Why Fun Folds Add a Special Touch
Fun folds have always been one of my go-to techniques when I want to elevate a card without adding too much complexity. With just a few extra cuts and folds, you can create something that feels entirely different from a standard card base. Plus, fun folds give you the opportunity to show off beautiful images and sentiments in new and unexpected ways.
For this project, the nativity scene takes center stage, while the unique fold gives the card a dynamic, layered look that will surely stand out on a mantel or Christmas card display.
Stamping the Nativity Scene
To begin, I used the Night Divine Stamp Set from Pajama Crafter Stamps and stamped the image of Mary, Joseph, and baby Jesus in the manger onto a piece of Marshmallow Cardstock from Pajama Crafter Stamps. For crisp, dark lines, I chose an alcohol marker friendly black ink (from my stash), which works beautifully with alcohol markers.
I’ve always found that this nativity image adds such a peaceful tone to holiday cards, making it a favorite in my collection. I colored the image using my favorite alcohol markers, bringing soft, natural tones to the figures while keeping the overall feel serene. Afterward, I used the coordinating die to cut out the nativity scene, which makes this part of the process quick and easy. The coordinating dies really help in giving that clean, professional finish, which I love.
Pro Tip: When working with detailed stamp sets like this one, I recommend stamping and die-cutting first before coloring. This ensures that your image is perfectly aligned with the die, especially if you have to run it through your machine multiple times.

Creating the Ink Blended Sky
The ink-blended sky is one of my favorite parts of this card. I wanted to capture the soft glow of early morning, right before the sun rises. To achieve this, I used a second piece of Marshmallow Cardstock and blended a mix of Distress Oxide Inks (from my stash).
Blending these colors together gives the sky a soft, magical quality that perfectly complements the peaceful nativity scene. I flicked a little water onto the panel, lifting some of the ink to add texture and give the appearance of stars or mist in the early morning light.
Pro Tip: When ink blending, start with lighter colors and gradually build up to the darker shades. It’s easier to blend and creates a seamless transition of colors without harsh lines.

The Fun Fold Technique
Now for the fun part—the fold! I wanted to keep this design simple but impactful, so I created a basic fun fold on a piece of White Ultra Thick Cardstock (from my stash) to form an A2 card base. After scoring and folding the card, I measured 3 1/2″ down from the top and made a cut to create the shortened front panel.
This fold adds a layer of dimension, and when the card is opened, it reveals the beautiful ink-blended sky inside. The shortened front panel also allowed me to feature the nativity image prominently above the sentiment, giving it a lovely, layered look when the card is both open and closed.
Layering and Final Touches
Once the fold was complete, I cut a piece of Marshmallow Cardstock to match the fun fold’s dimensions and added a second die-cut of the nativity scene inside. This created a perfect spot to write a personal message while keeping the focus on the scene itself.
I cut a smaller piece of Marshmallow Cardstock and stamped my “Merry Christmas” sentiment in Versafine Clair Nocturne Ink (from my stash), matting it on a piece of Coal Cardstock from Pajama Crafter Stamps. I attached this to the front flap, placing the nativity die cut just above, letting it overlap the sentiment for a cohesive design.

The finishing touches really bring this card to life. I die cut a star from silver foil cardstock (from my stash) and placed it in the sky behind the nativity scene. A few white gel pen highlights and some Fairy Dust Rhinestones from Pajama Crafter Stamps gave the design that extra sparkle it needed, especially when the light hits it just right!
Pro Tip: Adding subtle highlights with a white gel pen can really make your colored images pop. It’s a simple technique but adds so much dimension!
Final Thoughts
I hope you enjoyed this look at how to create a meaningful Christmas fun fold card using the Night Divine Stamp Set from Pajama Crafter Stamps. The combination of the traditional nativity scene with the unique fold makes this design both special and approachable for card makers of any skill level.
If you’re looking for a way to make your holiday cards stand out this season, I highly recommend giving fun folds a try—they’re easier than they look and add so much personality to your creations. Until next time, happy crafting!
Affiliate Disclosure: Some of the links in this post are affiliate links. If you make a purchase through these links, I may earn a small commission at no additional cost to you.
