Hello, my crafty friends! Rick here, bringing you another delightful project on the Pajama Crafter Stamps Blog. Summer is the perfect season for picnics, enjoying sweet treats, and making special cards for those dear friends who brighten our lives. Today, I’m thrilled to share a vibrant and cheerful card featuring the adorable Berry Sweet Fruit Treats Stamps from Prickley Pear/Pajama Crafter Stamps. This card is sure to bring a smile to anyone’s face, and I can’t wait to show you how to make it. So, let’s get started!

Easy Summer Picnic Friendship Card: Featuring Berry Sweet Fruit Treats Stamps & Dies
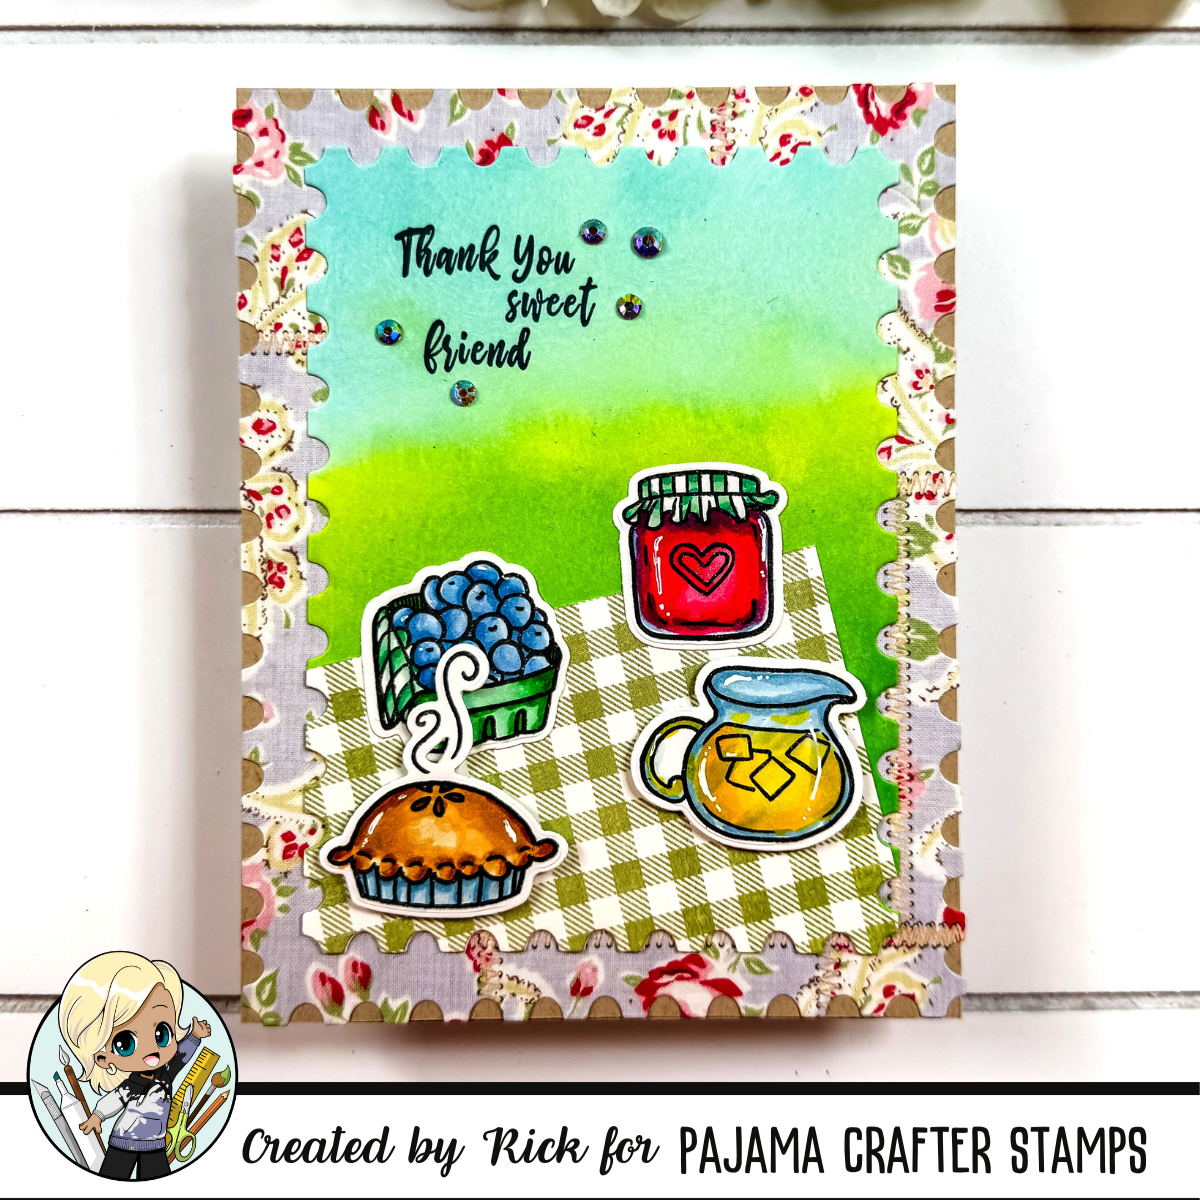
Stamping and Coloring
First, we’ll stamp our lovely images from the Berry Sweet Fruit Treats Stamp Set. Make sure to use alcohol marker friendly ink to stamp the pie, blueberries, jam, and lemonade images onto alcohol marker friendly cardstock.
One of my favorite parts of card making is the coloring. I grabbed my favorite brush markers from my stash and colored these delightful images to match a chosen piece of pattern paper I picked to use as my color inspiration. Coloring is so therapeutic—it always takes me back to lazy summer afternoons spent doodling in my sketchbook.

Die Cutting the Elements
Using the coordinating Berry Sweet Fruit Treats Dies, carefully cut out the colored images. Set these aside while we prepare the card base and background.
Preparing the Background Panel
Cut a piece of the patterned paper from the paper pad that you are using the with a large die the same size as your card front from a set of nesting dies your stash. This will form the background panel. Attach this layer to an A2 top-folding card base made from Kraft colored cardstock.

Creating the Picnic Scene
Take a piece of smooth white cardstock and cut it with the third largest nesting die from your stash that you used to cut out the card front. Ink blend an abstract grass and sky background using two shades of green inks for the grass and a blue ink for the sky.
Cut an additional piece of coordinating pattern paper from your chosen paper pad using the same nesting die you just used. This will serve as the picnic blanket on your card front.
Adding the Sentiment
For the sentiment, stamp “Thank You Sweet Friend” using three stamps from the Berry Sweet Fruit Treats Stamp Set in a dark ink color. Attach the card front to the card base.

Assembling the Card Front
Arrange the stamped and colored images on the picnic blanket. Use a combination of liquid glue and foam adhesive to add dimension to your scene. This mix of adhesives will bring a playful depth to your card.
I love using foam adhesive to make certain elements pop—it really brings the scene to life.
Use a White Gel Pen to add highlights to the stamped and colored images. This little touch adds a delightful sparkle and depth to your card. Finally, embellish the card with a few Fairy Dust Rhinestones around the sentiment—three at the top right and two at the bottom left—to complete the look.

Video Tutorial:
If you have problems watching the video tutorial here on the blog you can always watch it on our YouTube channel by clicking here!
There you have it! A beautiful and fun summer picnic friendship card, perfect for thanking a sweet friend. This project is not only enjoyable to create but also brings a warm, personal touch that any recipient will cherish. Happy crafting, everyone, and I can’t wait to see your delightful creations!
Feel free to share your versions and tag us—I love seeing what you create. Let’s spread the crafting joy!
The Pajama Crafter Stamps Affiliate Disclaimer:
Hey there, fabulous crafters! Just a heads-up: Some of the links you find on this blog are affiliate links. This means that if you click on them and make a purchase, I might earn a small commission at no additional cost to you.
I want to assure you that I only suggest products that I truly believe in and personally use. Your support through these affiliate links enables me to maintain this blog, allowing me to continue sharing valuable tips and creative inspiration with all of you.
If you have any questions about any of the products mentioned, don’t hesitate to reach out. I’m always here to assist you!
Thank you for being a part of this amazing crafting community!
Supplies Used:
